
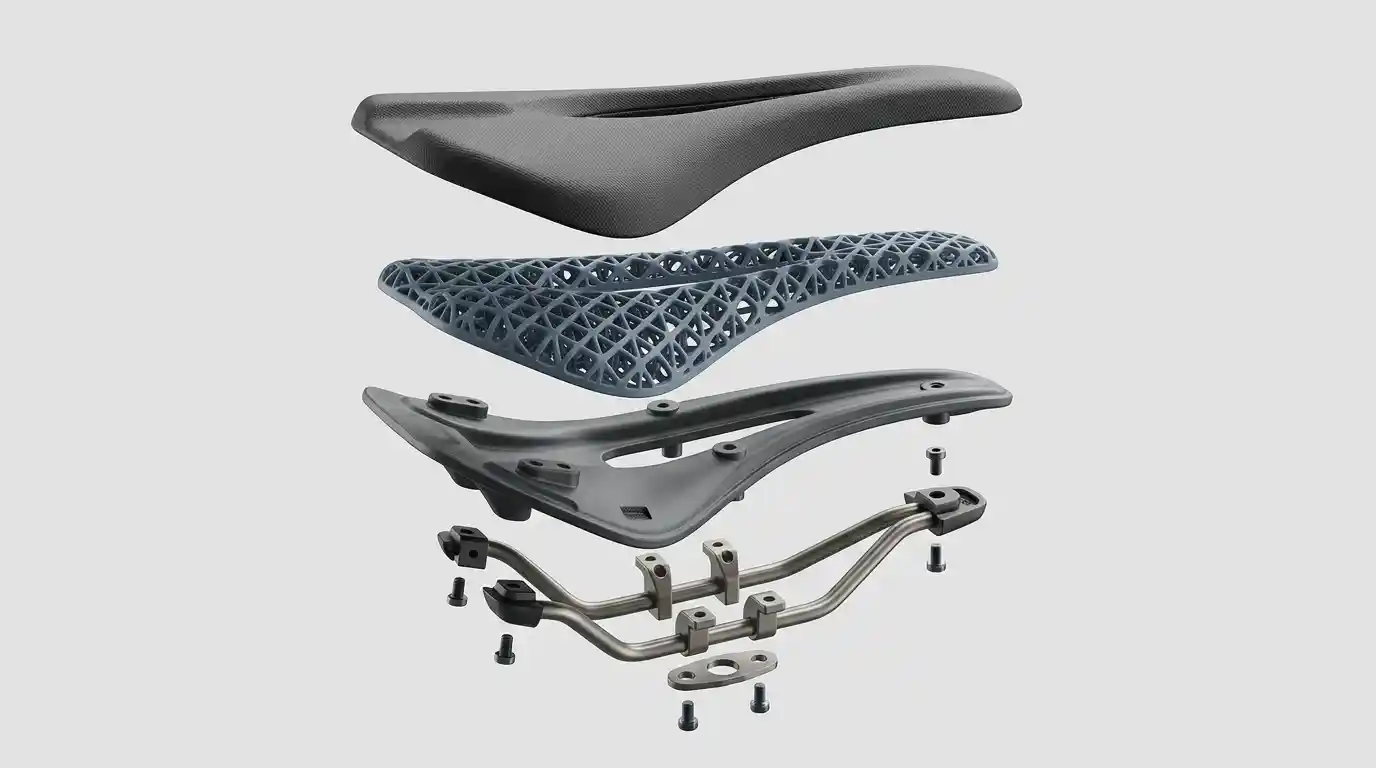
How B2B Buyers Should Specify a Road Bike Saddle for OEM and ODM
A road bike saddle should be specified as a product system, not as a photo, a width number, or a request for “more comfort.” The most useful starting variables are the intended rider position, use case, fit range, saddle geometry, pressure-relief strategy, construction, and validation requirements. Ergon’s current saddle selector, for example, considers riding posture, sit-bone width, sit type, relief zone, and problem areas rather than relying on one measurement. SQlab likewise links saddle width to both sit-bone measurement and riding position.
For an OEM or ODM buyer, the objective is therefore different from consumer saddle selection: turn an expected riding experience into measurable product specifications that a supplier can prototype, test, reproduce, and control in production.
1. Define the Rider Before Defining the Saddle
Start with the intended application:
- Road race, endurance road, gravel, or another defined use
- Typical riding position
- Expected rider segment
- Target ride duration
- Intended fit range
- Primary pressure or comfort objective
This matters because the usable support area changes with pelvic position and riding posture. Even professional saddle-selection systems treat posture as a separate input from sit-bone width.
Buyer rule: do not send an OEM supplier only a reference image. Send the intended use and rider-position requirements first.
2. Use Sit-Bone Width as an Input, Not the Entire Specification
Sit-bone width is an important sizing variable, but it is not a complete saddle specification.
SQlab’s current fitting system explicitly combines measured sit-bone distance with riding position and bicycle application. It also distinguishes effective usable saddle width from the maximum outside-to-outside dimension.
Ergon similarly uses sit-bone width together with posture, sit type, relief-zone preference, and problem areas.
For product development, specify:
Target width → usable support area → rear contour → transition shape → intended pelvic position.
Two saddles can share the same nominal maximum width while presenting different usable support because their profiles and contours differ.
3. Build a Measurable Saddle Specification
A professional specification should replace adjectives with measurable requirements.
Road Bike Saddle OEM Specification Checklist
| Specification Area | Buyer Should Define | Supplier Should Provide |
|---|---|---|
| Intended use | Race / endurance / gravel | Design rationale |
| Rider position | Target posture | Geometry recommendation |
| Width | Target or range | Finished dimension |
| Length | Target or allowable range | Dimensioned drawing |
| Profile | Flat / curved / other | CAD or profile reference |
| Relief | Channel / cutout concept | Defined geometry |
| Shell | Required construction | Material specification |
| Rail | Required type/material | Rail specification |
| Padding | Material/construction target | Material information |
| Cover | Material, finish, color | Approved sample |
| Weight | Target | Measured production data |
| Branding | Artwork and location | Production sample |
| Quality | Tolerances and defects | Inspection plan |
| Testing | Applicable requirements | Test method/report |
| Sampling | Approval stages | Sample history |
The key principle is simple:
A specification should tell the supplier what must be controlled, not merely what the finished saddle should look like.
4. Geometry Matters More Than a Single Width Number
Road saddle geometry should normally be considered as a group of related variables:
- Overall length and maximum width
- Rear platform shape
- Nose dimensions
- Longitudinal and transverse curvature
- Relief-zone position and shape
- Edge and transition geometry
- Shell profile
Shorter-nose and traditional long saddles, for example, represent different design approaches rather than merely different lengths. The correct choice depends on intended positioning and rider movement.
The practical B2B question is not “Which shape is best?” but:
Which geometry supports the intended rider position while maintaining the desired movement, pressure distribution, stability, and manufacturability?
5. Padding, Shell and Cover Must Be Specified Together
A saddle’s feel does not come from foam alone.
Padding interacts with the shell beneath it, the outer cover, the rider’s position, and the shape of the contact area. Cycling UK similarly emphasizes that saddle shape, width, and riding position matter to comfort, while padding alone does not solve an underlying fit problem.
For OEM development, avoid specifications such as:
“Use premium high-density foam.”
Instead define the required material construction and ask the supplier to provide the actual material specification and approved sample.
The same principle applies to the shell, rails, and cover. A material change after sample approval can alter weight, stiffness, durability, appearance, or manufacturing consistency.
6. Treat Pressure Relief as an Engineering Decision
A cutout or relief channel should have a defined purpose.
Riding posture affects where pressure is applied, which is why relief design should be evaluated together with saddle profile and rider position rather than treated as a decorative feature. Ergon’s selector explicitly includes desired relief zone and problem areas as selection variables.
During development, define the:
location → width → length → depth/profile → relationship to shell and padding.
A supplier should be able to explain what changes when one of these variables is modified.
7. Validate the Prototype Before Approving Production
A strong OEM development process is:
Product brief → Engineering specification → Prototype → Functional evaluation → Revision → Pre-production sample → Production approval
Each sample should answer a specific question.
For example, a new prototype may test whether a geometry change improves support, whether a relief modification produces the intended result, or whether a material substitution changes the product.
Do not allow the process to become “sample looks good, proceed to production.”
A production approval should identify the golden sample, controlled drawing, approved materials, critical dimensions, cosmetic criteria, and applicable tests.
8. Testing Must Be Defined Before Mass Production
ISO 4210-9:2023 specifies saddle and seat-post test methods for ISO 4210-2, while ISO 4210-2:2023 establishes safety and performance requirements for covered bicycle categories, including racing bicycles.
The buyer should therefore ask:
- Which standard applies to the target bicycle and market?
- Which saddle tests are required?
- What test method will be used?
- What constitutes a pass or failure?
- Will test reports be supplied for the approved configuration?
Do not write “ISO certified” into a specification unless the exact certification or conformity claim has been verified.
9. Supplier Verification: Sample Quality Is Not Enough
A supplier should be evaluated on its ability to reproduce the approved product.
Ask:
Can the approved geometry be maintained during mass production?
How are incoming materials controlled?
What happens if a material or component supplier changes?
How are engineering changes controlled after sample approval?
Which dimensions are inspected during production?
How are nonconforming products handled?
The important distinction is:
Sample approval proves one product. Process control determines whether the same product can be reproduced.
That is a central difference between evaluating a trading source and evaluating an OEM/ODM manufacturing partner.
10. Define Commercial Requirements Before Tooling
Engineering requirements are only half of a B2B specification.
Before development begins, define the commercial framework:
| Commercial Requirement | Buyer Should Confirm |
|---|---|
| MOQ | Initial and repeat-order requirement |
| Tooling | Whether new tooling is required |
| Tooling ownership | Who owns molds/fixtures |
| Sampling | Prototype and approval stages |
| Lead time | Sampling and production targets |
| Cost structure | Tooling, sampling, unit cost, packaging |
| Customization | Geometry, materials, colors, branding |
| Packaging | Retail, bulk, or buyer-specific |
| Change control | Approval required before modifications |
Avoid publishing generic MOQ, price, or lead-time figures unless a supplier has provided a current, verifiable quotation. These variables depend on the product design, tooling, materials, order structure, and production arrangement.
11. Use a Buyer Specification Template Before Requesting Quotes
Before contacting a bicycle saddle OEM supplier, prepare:
Product: road / endurance / gravel
Target rider: defined customer segment
Riding position: specified posture
Width: target or allowable range
Length: target or allowable range
Profile: desired geometry
Relief: channel/cutout requirements
Shell: required construction
Rail: required configuration
Padding: required construction
Cover: material and finish
Branding: artwork and placement
Weight: target
Testing: applicable requirements
Quality: critical dimensions and tolerances
MOQ: commercial target
Tooling: customization requirement
Sampling: approval process
Lead time: commercial target
This document becomes the bridge between product concept, supplier quotation, prototype development, and production approval.
12. The Right Specification Is a Trade-Off Framework
There is no universal “best” road saddle.
Every design balances competing objectives:
Fit ↔ movement
Pressure relief ↔ structural complexity
Low weight ↔ material requirements
Softness ↔ support
Customization ↔ tooling and development cost
Design flexibility ↔ production risk
A successful B2B saddle specification therefore identifies which trade-offs matter for the target product, rather than adding features simply because they sound premium.
Conclusion
The strongest road bike saddle OEM specification starts with the rider and ends with controlled production.
Define the use case and riding position, use sit-bone width as one important fit input, translate the concept into measurable geometry and construction requirements, validate prototypes, establish testing criteria, and verify that the supplier can reproduce the approved configuration in mass production.
The most useful sourcing sequence is:
Rider → Use Case → Fit → Geometry → Materials → Prototype → Testing → Supplier Verification → Commercial Terms → Production Approval
A capable OEM/ODM partner should not merely quote a saddle from a photograph. It should be able to convert a product requirement into a controlled, testable, manufacturable specification.
For brands and importers developing a custom road saddle, the next step is therefore not simply requesting a price. It is preparing a specification that allows suppliers to quote the same product, compare engineering proposals objectively, and identify tooling, cost, quality, and production risks before the order reaches mass production.
Source basis: ISO 4210-2:2023 and ISO 4210-9:2023; Ergon Saddle Selector and ergonomics guidance; SQlab saddle-width methodology; Cycling UK saddle-fitting guidance.